|
|
|
Quick Start Guide
|
|
|
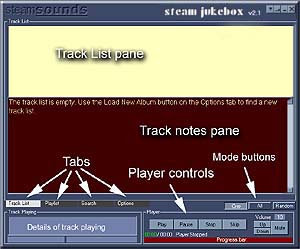
When you start Steam Jukebox Player for the first time you will see something like the picture to the right. The main track list window is divided into
three parts; Your first job is to load a Steam Jukebox Album so click on the Options tab. |
 |
| Here
you can change the appearance of Steam Jukebox (among other things) but
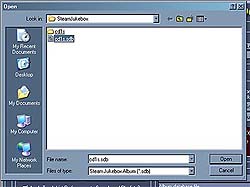
all we are concerned with at the moment is loading a new album. Click the the Load New Album button and a dialogue like the one below will open. Select an album. |
|
|
|
 |
| Now we are back in the main track list. | |
|
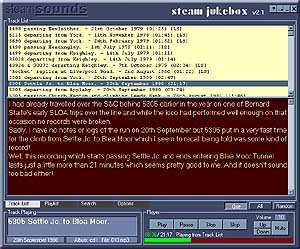
This is the part of Steam Jukebox that you will use most. In the top pane
you will find a list of recordings available in the album you have just
loaded. If you double click on a track (or press the Play button) the selected track will begin playing. At the bottom
you'll see the track title, date and the name of the album along with
the filename. |
 |
|
The player control buttons are also here. You can Play, Pause, Stop or Skip a recording. You can also change the playback volume. Above the player controls are the play mode buttons. These allow you to just play one track. Or, if you press the button marked All to play all the tracks starting with the one selected or you can play random tracks from the currently loaded album. If you only have the demonstration sample album
(cd1s) then only 6 of the recordings in the track list are available
to play. These are clearly marked SAMPLE and are just short low quality
files to let you try the programme. Complete albums will have CD quality
recordings. |
|
|
There are two other tabs; Let's start by clicking the Search tab. |
|
|
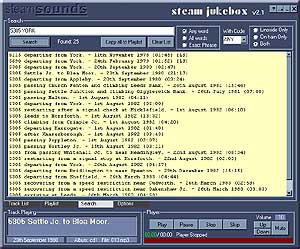
Each album will
be supplied on a CD or DVD. Enter the text
or number that you want to find in the search box and click the Search
button. You can search for any matching words or have all the words
match or you can search for an exact phrase. |
 |
|
You can also select recordings with a particular code. The code will usually indicate where the recording was made; MLS refers to Main Line Steam, SVR to Severn Valley Railway - I'm sure that you will be able to work these out for yourself. Having found recordings of interest there are a few things we can now do with them from the Search tab. The simplest thing to do is just play a recording.
Double click on the title or click the play button. |
|
|
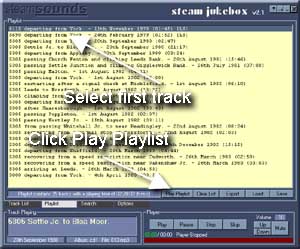
Which will take us to the Playlist tab where we can see the recordings that were listed in search results. |
|
|
Once again the simplest thing we can do here is double click on a recording to play it (or click the Play button). Instead, make sure that the first recording is selected then click the 'Play PlayList' button. If you click the Play button in the main controls only the selected track will be played, not the whole list. So now we are back in the main Track List but all the recordings in the Playlist will now play in the order they are listed and you will be able to read the notes about each track as they play. There are other things that you can do from the Playlist so click on the tab to go back there. |
 |
|
If you look at the buttons you will see that you can clear the playlist. You can save or load a playlist. You can also delete an individual track from the playlist - try right clicking on it. You can Export
the recordings in a playlist. |
|
|
Well, that's just about it. Except that there are couple of other things worth mentioning; If you don't like the appearance of the programme
have a look on the Options tab where you can change the colour and size
of text. You can always return to the defaults by pressing the appropriate
button! Have fun! |
|